10 Things I Wish I Knew About Discord
Love it or hate it, Discord is the epicenter of web3
No time to read? Get your Discord tips through your favorite podcast platform 👇
 |
 |
 |
|---|
GM web3 explorers!
Discord has become one of the main platforms for all things web3 with servers for NFT projects, layer 1 blockchains, DeFi dapps, and basically the whole ecosystem!
Why? 🤔
Simply put, a company that wants to flourish in this space can’t do so without building community—and Discord provides a platform for just that. It allows projects to easily communicate with their communities through announcements, live Q & As, general chats, and even host games to engage their members.
But using Discord can be pretty painful sometimes—especially if you’re in 10 or even 100s of servers. So it wasn’t until we learned these simple tips that Discord became enjoyable to use. 😮💨
To help you reach the Discord pro leagues, the Web3 Academy DAO put together this Deep Dive in which they’ll cover:
- How to protect yourself in Discord 🛡️
- Managing your DMs like a pro 🗣️
- Organizing your servers for easy access ✅
- How to get involved in community meetings and events 👯
And much more.
Before we dive in, though, we just wanted to give a final shout-out to the hundreds of DOers that went PRO over the last week and scored themselves the deal of a lifetime. 🔥
We appreciate your support and will be serving on-chain insights to your inbox every Thursday. 🙏
If you didn’t join yet, you know what to do—go PRO and join the web3 elite!
But for now, let’s get into today’s scheduled reading.
1. Don’t Skip the Introduction Channel!!
Let’s say you’ve found a community you like. You’ve read their whitepaper, followed them on Twitter, and gone through every web page.
Now you’re ready to join their community.
After you agree to the rules and verify your account, as most Discord channels require, you’ll be sent to an #introduction or #introduce-yourself-channel where you can introduce yourself to the community.
If you’re like most people, chances are you skip this and go straight to browsing other channels—don’t! This is a great time to start making new friends and getting more involved in the project.
But what do you say?

If everyone in the channel seems to be saying whatever they want and there weren’t any introduction prompts to follow in the #welcome channel, then it’s up to you to make an excellent first impression.
Here are a few ways to do that:
“Hello, my name is ___, and I’m from ___. I discovered your community on ___. I am very ____ about your community/project/purpose. After visiting your website and reading your whitepaper, I am ___ to get involved.”
“Hi, I’m __ I just read your whitepaper and followed you on Twitter. I ____ what you guys are doing/building, and I am ____ to join your community.”
“Hello, I’m ___ I heard about your project, and I am ____ to get involved. I’m a ____, and I live in ___. I am interested in contributing to your community and would like to know more about how I can put my ___ skills to good use.”
“Hi, I’m ___, from ___. I’m a ___. I like what you guys are building and am excited to join the community.”
After that, you’re free to roam wherever you please. But again, don’t skip this step! Writing a thoughtful introduction is one of the fastest ways to build solid connections in web3 communities.
In fact, Jay has even reintroduced himself in several communities because it’s simply the best way to connect with people.
2. Keeping Yourself Safe on Discord
Unfortunately, there are a lot of predators, annoying bots, and scammers lurking about on Discord.
To avoid falling victim to a phishing scam or receiving unsolicited DMs, click the settings button—the gear icon in the bottom left of the Discord window near your username.

Select Privacy & Safety and copy the settings in the following image. Alternatively, you can choose “Keep me safe” and set everything else to off. And you’re done.
Click ESC (the circled X) to return to the main page.

Controlling who (or what in the case of bots) can DM you is a great first step to protecting your privacy. But you may also want to manage how (or if) you appear online.
Some other guidelines to follow include:
- Setting up two-factor authentication (2FA).
- If you don’t block DMs, ensure you report any spammers and scammers that DM you.
- Avoid clicking Discord links from people you don’t know unless you’re absolutely sure the link is legitimate.

QUESTION
How Do You Secure Your Discord?
- Set up two-factor authentication.
- I never click random Discord links.
- I only accept DMs from friends.
- All of the above.
Let us know by replying in the comments below!
3. Changing Your Online Status
I’m sure you noticed the little green dot in the corner of your profile picture. That green dot is your status, and it shows if you’re active on Discord or not.
Like most applications, your status will be based on whether you have the application open.
But what if you want to catch up on the chat or get familiar with all the channels on the server and don’t want to reply to your DMs just yet?
Well, you don’t have to. You can right-click on your profile picture and choose one of the four status options. Invisible is excellent for catching up on all the different channels without feeling like you need to reply to people.

And if you find yourself always checking Discord for the latest alpha or there are just way too many notifications to keep track of, setting your status to Do Not Disturb will do the trick. This setting stops notifications so you can focus on other things.
4. Managing Your DMs🗣️
You can access your direct message (DM) screen by clicking the Discord icon in the upper left of your screen.
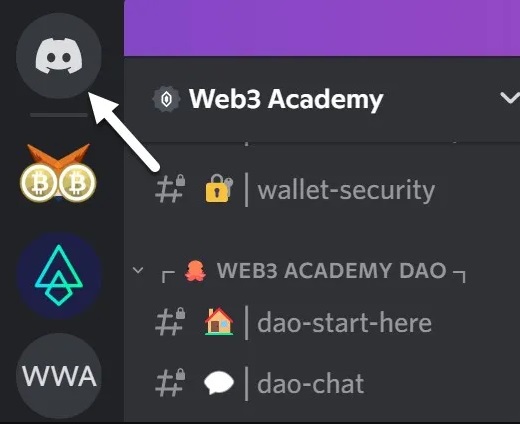
Here, you‘ll see a list of your friends and your DM history. You can also view and accept your friend requests or invite others to connect by clicking on the relevant tabs.

Let’s look at the tab options:
- Online: Shows which of your friends are online.
- All: Lists all of your friends, online and offline.
- Pending: This will show you pending friend requests that you’ve either sent or received.
- Blocked: The blocked tab lets you see anyone you have blocked.
- Add Friend: If you want to invite someone to be your friend, the easiest option is to click on their name and then their PFP. It’ll bring up a screen with their user information and a green bar that says Send Friend Request. Alternatively, you can also add someone if you know their full user name. You can find this information by clicking on their name then all you need to do is copy and paste it into the Add Friend tab.

The more involved you are with web3 communities, the more servers you’ll join (up to 100 are allowed with the free version, 200 with a Nitro upgrade).
5. Organizing Your Discord Servers
Although Discord gives you the option of adding friends individually and talking directly to them, most people come to Discord to join a server.
Before we talk about how to organize your servers, let’s recap how to join one. You can enter a private server by invitation from a company’s website or by adding a server in Discord using the plus sign in the lower left navbar.
You can also search public servers using the compass icon if you don’t have an invite.

Servers appear in the left-hand navigation pane your most recently joined servers staying near the top. But you can rearrange them by clicking and dragging them to your desired location.
As you add communities, you may find navigating them difficult. Fortunately, Discord allows you to group servers into categories to keep things nice and tidy (and find them faster!). Each folder holds up to 100 servers, so you can easily find a system that works best.
To create a server folder, click and drag one server on top of another in the left navbar.

You can also customize your folders. Right-click the folder and select Folder Settings. Here, you can name the folder and change its color.

To remove a server from a folder, drag it out and place it above the folder. Discord will automatically delete the folder when there are no more servers in it.
Now you can easily find each community that you’re involved in. But in active communities, it also becomes difficult to find an important post that you read recently.
Here’s where Discord’s search functions come into play.
🤝 Together with Unlock Protocol: NFT Ticketing is the Future. Learn How to Easily Create and Sell NFT Tickets for Your Next Event!⚡

6. Searching in Discord
You can find Discord’s search bar in the upper right-hand corner of your window—it’s the one with the familiar magnifying glass icon. Or, if you want a faster option, you can use CTRL + F (Windows) or CMD + F (Mac) to bring up the search bar for the channel you’re in currently.
As you can see from the image, you have a variety of search options in Discord. For example, you can click on mentions: user and then type in the name that was in the chat message (i.e., @Borlokva). This will bring up every message that mentions that particular user.

You can also use the search function as you would use Google. Just search for relevant words from the message you’re looking for and you should be able to find it.
Pro tip: You can also combine these search options. For example, you can combine from: user with words from the message you’re looking for.
For additional information, check out Using Discord Search.
7. Editing a Message After It Has Been Sent
Imagine this: You’re hanging out in your Discord community, and you have a stroke of genius!
Excited to share the thought, you quickly type out your idea. You skim it to check for errors, add the last exclamation point and hit enter.
And just as it goes live, you notice a typo! Now what?
Stress not, you can easily edit a message after it has been sent. To do so, hover over the message you sent with your mouse, and click the pencil icon in the pop-up menu (it will be in the top right corner of your message). Here, you can make your changes then press enter to save it and everyone will see the edited message.

You can also right-click on your sent message or press and hold on mobile and a menu will appear where you can choose to edit the message. Just remember to press enter to save your changes!
8. Joining Meetings and Events
Server channels are designated with an icon that quickly tells what type of channel it is. Text channels are shown with a hashtag (#) symbol while voice channels have a speaker icon.

By default, Discord organizes channels by text first, then the voice channels. But you’re free to reorder them if you want.
Many servers provide information about meetings and events in a specific channel. There, organizers post the name of the channel to meet in and the date and time in a text chat channel.

To join the meeting or event, navigate to the correct channel and click the voice chat icon (or pop back to the meeting announcement and click the Join Voice button).

When you’ve joined the call from your computer, you’ll notice an indicator that says Voice Connected (above your username and the mic icon in the lower left corner). On a mobile device, the green band at the top of your screen lets you know your audio is connected. To disconnect from the call, tap Voice Connected and the End Call button.
Many communities encourage members to appear on video during meetings. The active video screens will pop up in the main panel when you are on the call. You can turn on your video using the camera icon.
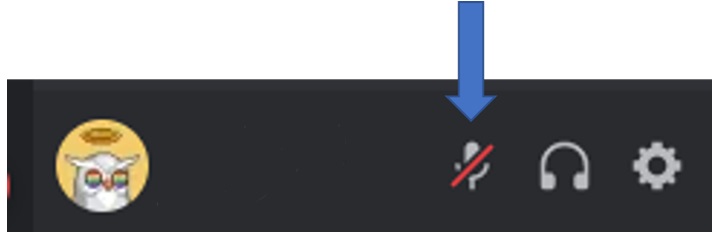
BEWARE! Clicking on a voice channel instantly connects you to the voice chat. So depending on your server’s settings, you may be the only one on the call, or everybody on the channel might hear you trying to hit that high note in your favorite song. 😲
The best way to avoid that awkward moment is to mute your mic. There’s a mic button at the bottom right of the screen, next to your profile name. Tap it to mute yourself. It will stay muted until you unmute yourself in a new session.
9. Making Voice Calls
Discord makes it easy to connect with people from around the world. You don’t need a server to talk to a friend directly, but they must be on your friend list (see instructions for managing your DM box above).
When you’re ready to call someone, click on the Discord logo icon in the top left, then on Friends in the left navbar to see your currently active friends. Click on the icon with three vertical dots and choose Start Voice Call.

You can also start a call in a direct message with your friend by clicking the phone icon at the top. Video calls work the same way, but you click on the camera icon instead.
If you want to make group calls, the easiest option is to start a chat with someone and then add more people to the chat using the button below.

Now, say you’ve just finished your group chat, but some participants shared important links in the text chat.
Are these messages doomed to be lost to the sands of time? Not at all.
10. Accessing Chat Messages After an Audio Session
Thankfully, Discord saves all call-chat comments, so you can easily find them in their respective call channels.
You have two options to view a call chat, either right-click on the call channel or hover over it, then select open chat, and voilà! The chat window opens with all the current links and comments.

These chats will be saved in perpetuity, so if there’s something important in there, it’s a good idea to save the message or link elsewhere. Otherwise, you might find yourself scrolling for hours each time you want to find a link.
SOCIALS
Meme of the Week

BONUS LESSON: Creating a Message Thread
When you’ve used Discord for a while, you learn how fast a bunch of random messages and conversations can suffocate or even derail a discussion.
So, to escape the noise and keep your discussions flowing without a hitch, use message threads.
Here are three ways to do it.
The first way is to click on the hashtag icon overlaid with a chat bubble which is located on the right side of the channel name at the top of the page.
This will open the following window.

Click the blue button, and a side thread panel will open (see below). Name it, and you’re good to go.

The second method is to click the round-plus icon in the message box (see below). A menu will pop up, showing the thread icon. Click it and start your thread.

Lastly, you can hover over any message, and you’ll see the thread icon and then… Well, you get the drill 😊
See You Over on Discord!
Congratulations, you’re now up to speed on all things Discord, meaning you’re now a true web3 explorer.
Using the lessons in this deep dive, you can perfectly organize your Discord, keep yourself safe from scammers and spammers, and easily engage with community events.
But as you know, Discord can be confusing for many people, so do your fellow newbies a favor and share this article with them.
Better yet, show it to server moderators so they can use it as required reading for all new joiners!
And since you’ve made it to the end of this deep dive, we know you’re serious about web3. So make sure to join the Web3 Academy Discord server and get involved in our daily chats, community events, and more.
Until next time, frens. ✌️
P.S. The next DOer Spotlight breaks down the best practices of building a Discord for your community, don’t miss it!
ABOUT THE AUTHOR
Web3 Academy DAO
Contributions from: CandyToyBox, Vanessa Glover, Borlokva, and Charles Carr
Find them: Web3 Academy DAO
FOR THE DOERS
Take Action & Level Up
LEARN
Take our FREE Web3 Rabbit Hole Course to get up-to-speed on the foundational components of Web3 so you can confidently build, work, or use the fastest growing technology in history.
READ
Discover why the music industry is ripe for disruption in: The State of Music and How NFTs Are Making the Industry Fairer.
PREVIEW
Check out the last free Web3 Academy PRO report: Is Solana Following in ETH’s 2018 Footsteps?